首先Fork一个仓库,地址如下:
https://github.com/ddiu8081/chatgpt-demo
https://github.com/ourongxing/chatgpt-vercel

注册并登录 Vercel ,关联上自己的GitHub
这个网站很强大,用于部署前端服务很方便,也可自行部署在其他平台,或本地部署
Dashboard - Vercel

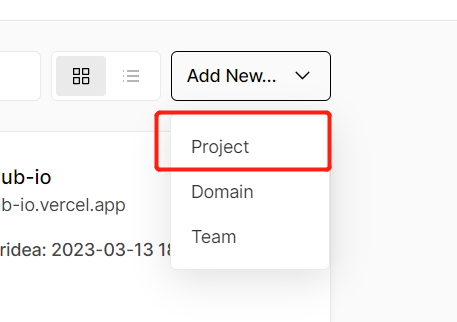
1、创建一个Project;
2、选择刚刚Github Fork的 chatgpt 项目 ,点击Import ;

3、编辑项目名,框架预设会默认:Astro,不用修改,点击Deploy;


4、编辑成功后即可看到如下界面,点击 Continue to Dashboard ,打开仪表板;

5、你就会看到已经构建成功,并且Vercel分配了域名;
vercel默认分配的域名已经被墙了,国内不能直接访问。

6、因为默认域名不能访问,所以要配置域名转发,用自己的域名进行访问,点击View Domains;

7、添加一个子域名,例如我的域名是lihail.cn,我添加一个chatgpt.lihail.cn,点击Add;

8、这个时候Vercel会检测你这个域名有没有配置域名解析,解析到chatgpt.lihail.cn,记住下面Type、Name、Value;

9、打开你的域名管理后台:DNS 解析 DNSPod,例如我是腾讯云购买的域名,输入主机记录=Name;记录类型=Type;记录值=Value;最后点击保存;

10、回到Vercel后台,这个时候你会发现,检测到你域名已经解析完成;

点击访问 chatgpt.lihail.cn,就成功了!

11、打开 Openai 官网,登录并且获取自己的API key并复制;

12、点击设置,在OpenAI API Key的位置填入刚刚复制的key并回车;

这个时候就可以愉快的使用chatGPT了~

输入 / 或者 空格 搜索 Prompt 预设例如:周报生成器

基于Vercel部署chatGPT的所有流程已经完成。最后,我们要感谢OpenAI、开源社区和开源工作者的贡献,因为他们让我们能够更加高效地开发和部署自己的项目。
源代码由ddiu提供,ourongxing修改。
ddiu8081 - Overview
You can't perform that action at this time. You signed in with another tab or window. You signed out in another tab or window. Reload to refresh your session. Reload to refresh your session.

ourongxing - Overview
You can't perform that action at this time. You signed in with another tab or window. You signed out in another tab or window. Reload to refresh your session. Reload to refresh your session.
