

GPT-3, Stable Diffusion, Dall-E, Mid Journey….AI algorithms have been all the rage in the software development sphere for the last couple of months. There is a good reason for this. These technologies have a wow factor that is irresistible. It is the first time in my life that I have seen such a seemingly instant progression from pipe dreams to reality. This is what it must have felt like to be around during the dawn of personal computing and the internet. It is increasingly obvious that AI in the form of machine learning is going to drastically change all of our lives over the next decade.
Personally, I find GPT-3 to be the most impressive machine learning model. Don’t get me wrong, the text-to-image models are absolutely amazing and revolutionary, but there is something about receiving text answers to any prompt that slaps all of my preconceived notions of what is possible with technology right in the face. It doesn’t feel like just a tool, but rather an extension of my own brain. Like a friend who is always there to offer their thoughts and critical analysis. It is not just one friend either, you can design the traits of the “person” you are talking to. Mimicking the perspective of historical figures is a particularly interesting use case, especially those who are no longer with us.
If I could speak to any person in history, I would choose to speak to Siddhartha Gautama, known more commonly as the Buddha. We tend to think of spirituality and science as very different endeavors, even opposites. I do not believe this is the case. I believe that spirituality and science are very similar, with both of them being very incomplete ways of understanding the universe. This is why I have decided to make an application that uses GPT-3 to give advice from the perspective of the Buddha. Let’s get into how I did that.

I also made a video tutorial for this project, which you can find here.
1. Design Your Prompt
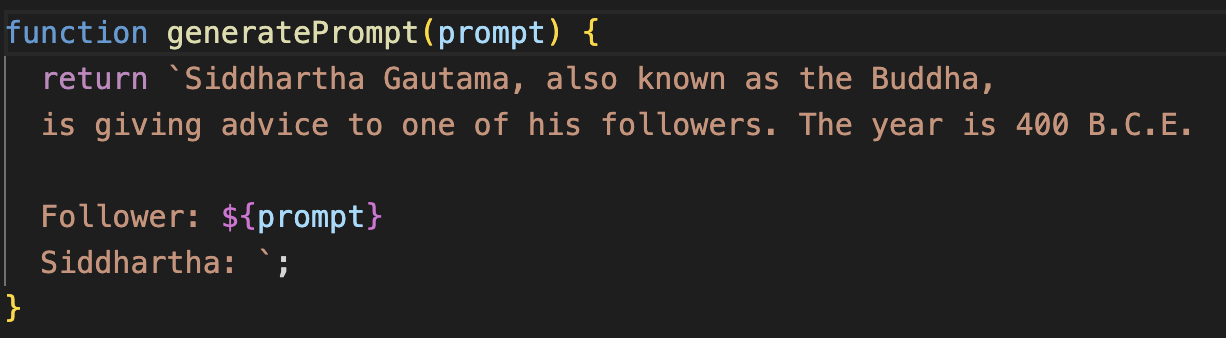
To start, we will go to the quickstart tutorial on the OpenAI API website. From there you can simply follow the given steps to set up your project. The first step is to determine a prompt. This is a vital step because with a custom ChatGPT application, what you are basically doing is putting the user’s input in the context of a bigger prompt so that the model responds in a particular way. Here is what I used for my prompt:

You can see in my prompt that the follower of the Buddha asks a question, this question is what will be replaced by the user input in our app.
2. Set Up Your Project
Now, it is time to build. You will need to copy the commands given in the setup section of the tutorial. After installing your .env file, you will need to generate a secret key and copy that key into your .env file. Once you do that, you will have a Next.js project which generates animal-themed superhero names. Run npm install and npm run dev to complete the setup and deploy the project to a local server.
3. Add Your Prompt
After testing out the application and exploring the code a bit, open the generate.js file, which you can find in the api folder. In the generatePrompt() function, you will see a return statement containing the prompt that is used in the app. Replace this prompt with your own custom prompt and delete the capitalizedAnimal variable that is declared before the prompt. The user input is currently called “animal” as you can see in the function parameter, so you will put ${animal} in your prompt where you want the user input to be. Now your custom prompt will be run when generating a response(I have changed the “animal” variable to “prompt” in my project, but you can stick to “animal” for now.
4. Adjust Settings
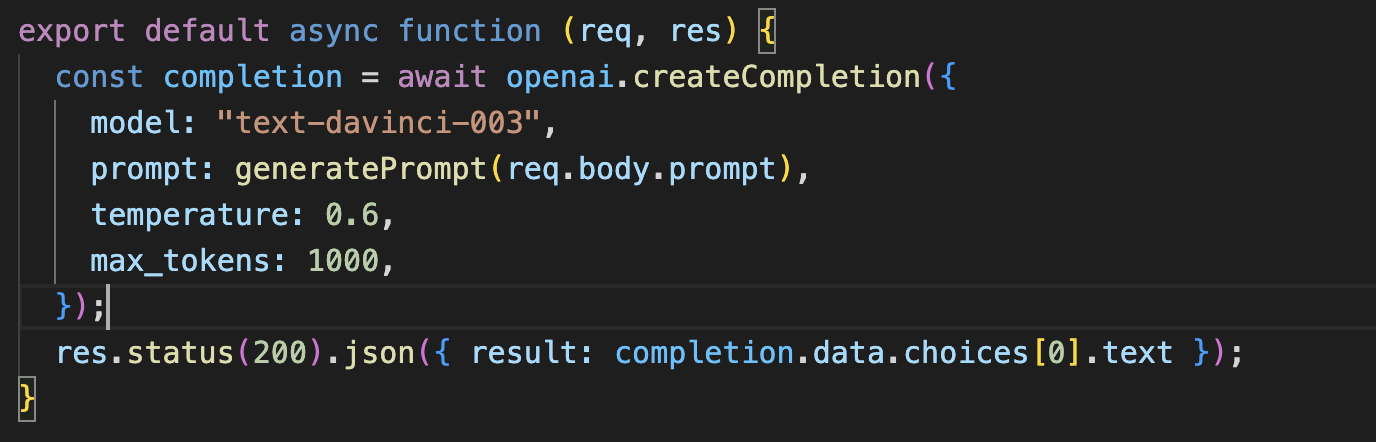
The settings for the model can be found as parameters in the openai.createCompletion() function. After some experimentation, I have decided to change the model to “text-davinci-003”, and set the max_tokens attribute to 1000. This gives me the most advanced text model and makes the responses much longer. I encourage you to do some further research and experimentation on these settings.
5. Style Your Application
Congratulations! You have created your own custom ChatGPT application, but unless your project happens to be in the theme of animal-based superheroes, you are going to want to change the styling. You can do this by editing the index.module.css file. You also are going to want to call the user input something else besides animal if you want your code to be readable. You can see in my code that I changed the variable name to “prompt”.
%26blogName%3DLe%2520Blog%2520du%2520Matt%26blogImageUrl%3Dhttps%253A%252F%252Fstorage.googleapis.com%252Fpapyrus_images%252F5ae0d5395375d864b84065eda204a87d.png%26coverPhotoUrl%3Dhttps%253A%252F%252Fstorage.googleapis.com%252Fpapyrus_images%252F00a6a282f93c90a414c6c82144cf2782.jpg%26size%3D1024%26publishedDate%3D1671580800000&w=3840&q=75)
