


What is Arbitrum Stylus?
Arbitrum Stylus is a new way to write smart contracts that run on the Arbitrum network. It allows developers to use languages like Rust, C, and C++ instead of Solidity. This opens up new possibilities for building decentralized applications (dApps) and makes it easier for developers who are already familiar with these languages.
Stylus Links
Why Use Stylus?
Performance: Contracts written in Stylus can be more efficient than those written in Solidity. This means lower gas fees and faster execution times.
Familiarity: If you already know Rust or another supported language, you can start building without having to learn Solidity from scratch.
Interoperability: Stylus contracts can work alongside existing Solidity contracts, allowing for a smooth transition and integration.
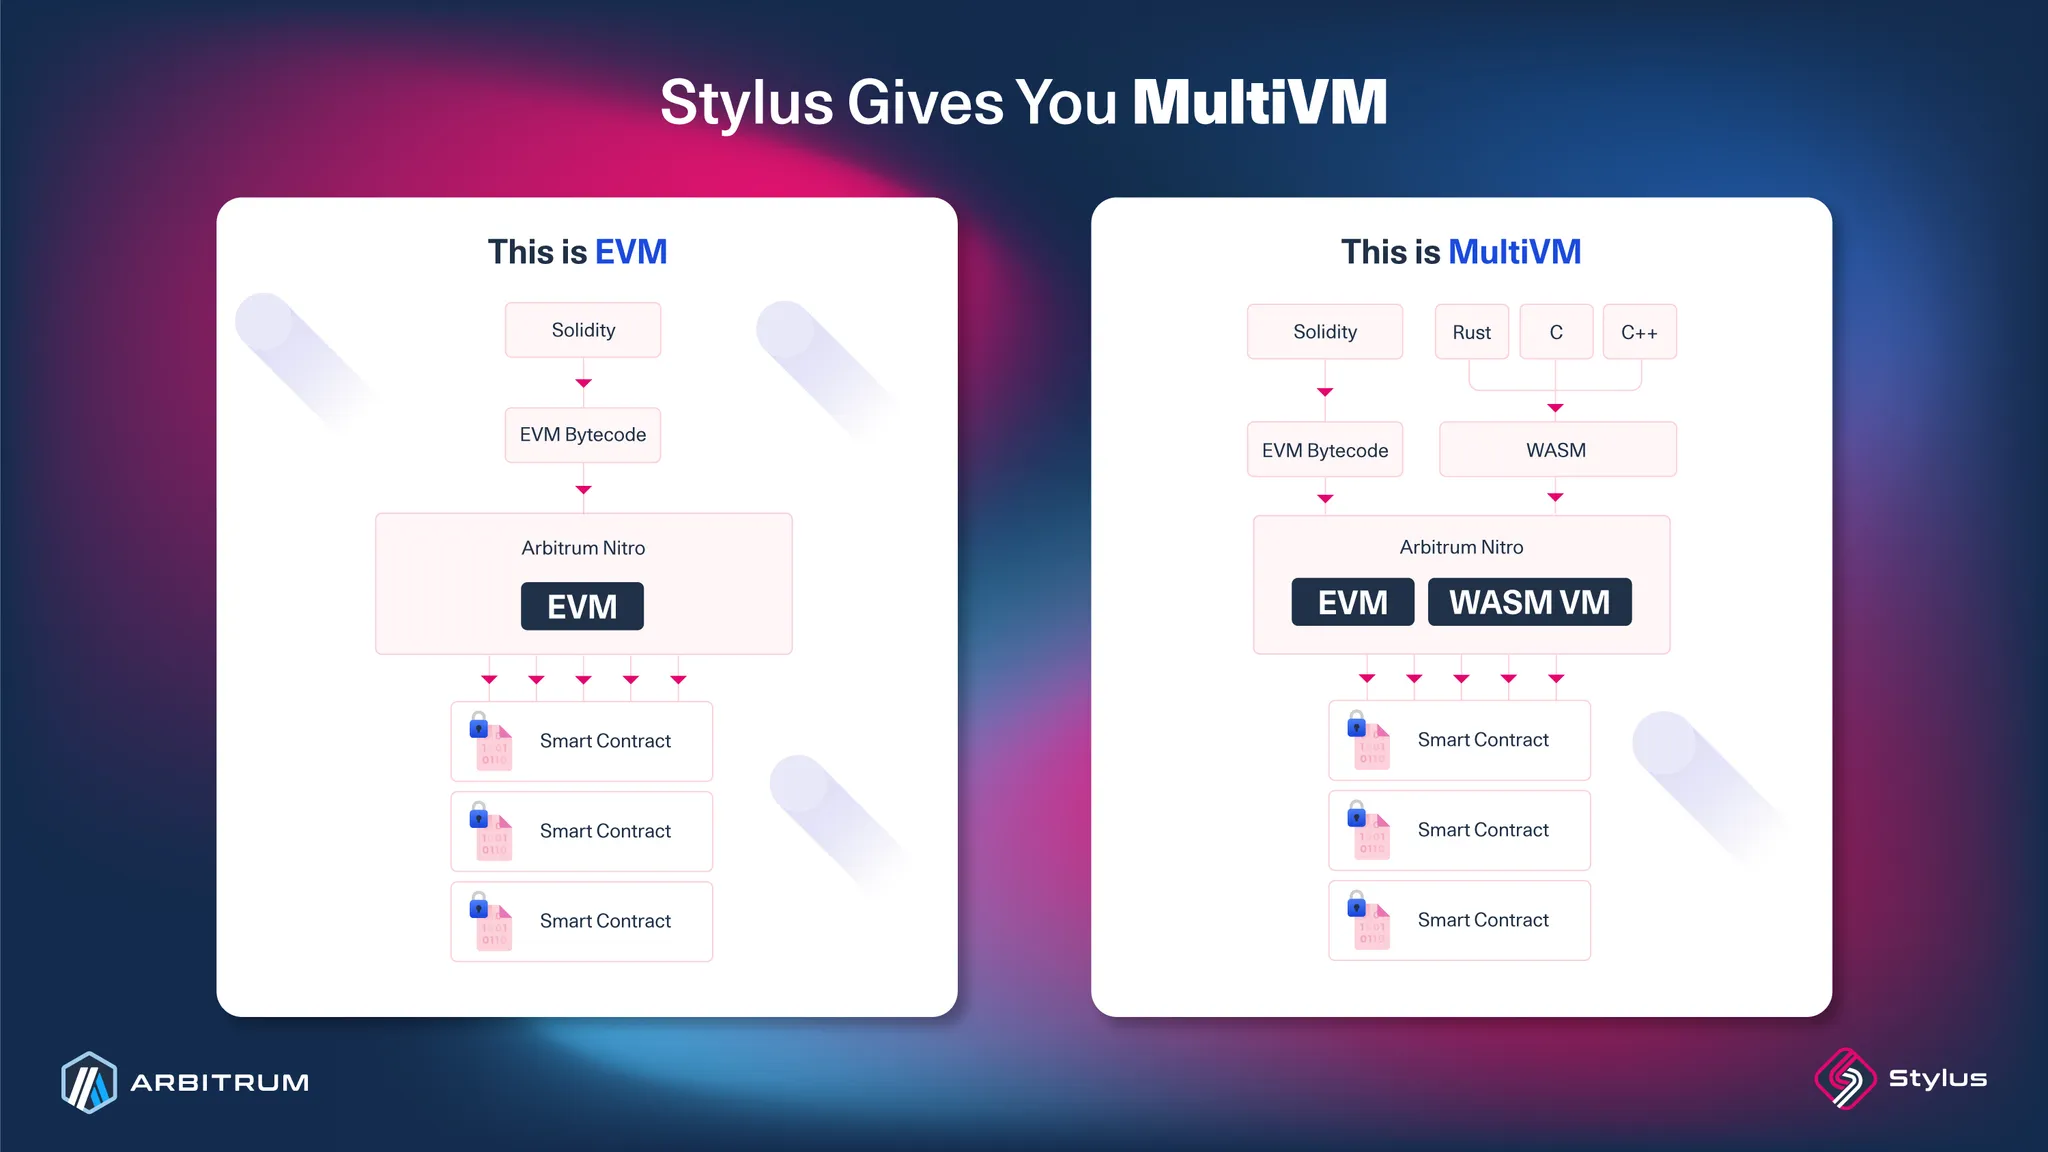
Stylus is an upgrade to Arbitrum Nitro, the tech stack powering Arbitrum One, Arbitrum Nova, and Arbitrum Orbit chains. This upgrade adds a second, coequal virtual machine to the EVM, where EVM contracts continue to behave exactly as they would in Ethereum. We call this paradigm MultiVM since everything is entirely additive.
let's take a look on how to set up and use Stylus SDK
in this guide we will talk about two methods
one in ur local computer by using Command Line Interface ( CLI )
another is using an online IDE called Remix
https://remix.ethereum.org/
let's use the easier and quicker method first
> go to https://remix.ethereum.org/
accept the term and conditions finish the site tour
> next on the bottom left side click on "Plugin manager"

on "Plugin Manager" page
> Activate the "Arbitrum Stylus" plugin.
> use the search bar to look for "Arbitrum Stylus" plugin if it's not in the home search page.
now after Activating "Arbitrum Stylus" you can see the Arbitrum Stylus tab

here in the Arbitrum Stylus tab
> sign in with your web3 wallet.
> after that you can choose the network,
in our case we are using Arbitrum Sepoila (Testnet)
there are different project templates, but in our case we are gonna use
> hello-world template
> click on “Create” it will ask for Files permission, grant the permission.
and it will load all the require files for you
after choosing the template it will load all the required code files to our workspace
for chains and rpc
you can use https://chainlist.org/ to add different networks to ur wallet (incl. testnetworks)
https://github.com/ethereum-lists is great source as well (thanks to collabpunk.eth for reccomendation)
After Adding Test Networks
> > We will need some Testnet ETH for powering these transactions.
There are multiple Faucets available
we will use Arbitrum Sepolia Faucet By Alchemy 😀
https://www.alchemy.com/faucets/arbitrum-sepolia
now after funding our wallet with test Ethers.
let’s head back to Remix
after writing our codes we can get back to Arbitrum Stylus tab
> then click on "compile"
it will compile our codes
after completing of this process it will show " Build Complete"
then click on "deploy" to push the codes onchain
it will ask you to confirm few checklist
confirm and sign the transaction to publish it on the blockchain
voila we have successfully written a smart contract in Rust, and deployed it to the blockchain

you can visit the contract page on the explorer site to check the deployed files
on the explorer in contract section you will be able to see options to Export ABI, Read, Write Option, And option to Check All the Files and codes

here in “ Write Contract " Section You can interact with your contract

here we are doing a increment to our contract.
after clicking on write
> confirm the transaction on the wallet
> after successful transaction

we can see the contract transaction on Block Explorer
>Call ‘Increment’ is used
There are various others methods to interact with our Contract, we just used the most easiest path.
till now
we deployed our contract through Remix Online IDE
and interacted with our contract via Block Explorer
enjoy this meme

hope u learned and enjoyed till now.
Now We will use CLI to Deploy Contract On The Blockchain
though using online ide is the easiest method, it’s not always suitable.
so now we will setup our local environment for building Stylus Smart Contract
Pre-Requisits
we need to check and setup these before Writing Smart Contracts
(embedded links redirects to installation page, all of these are super easy to install)
> Rust ( cargo )
> Cargo Stylus (Stylus SDK)
> Foundry ( To Use Cast and other Foundry Tools )
> Docker ( Container )
> Docker Compose
> Nocal Dev Node ( Arbitrum Dev Node need up and running to do transactions locally )
Note : Some Linux Distros already have few tools preinstalled, so check on ur Terminal before to avoid any issues.Play Video
After Making Sure All The Required Tools Are Installed ( Keep The Local Node Running )
let’s start building a Smart Contract on Rust
> let’s create a new project first, by using
cargo stylus new <projectname>

This Will Create Project Directory And Files.
You Will See ‘scr’ folder and ‘lib.rs ‘ in src folder
now open this folder in ur favourite IDE ( vim / VS Code or ur preference )

in our case we are using VS Code .
> here run a Stylus Check ( to check whether your contract can be deployed onchain or not)
cargo stylus check
it will take a while
in the meantime
> check the Local Node


keep this node running in the background
Now We Will Deploy our Code
Here We Will Use cargo stylus deploy command
and we will use the give wallet and private key from Arbitrum Node Docs Page
Wallet Address: 0x3f1Eae7D46d88F08fc2F8ed27FCb2AB183EB2d0E
Private key: 0xb6b15c8cb491557369f3c7d2c287b053eb229daa9c22138887752191c9520659
This wallet is funded with Local ETH so we don’t need to Fund our Wallet from any faucet as of now.
In Our Case we are using in built CLI in VS Code,
( u can use Console/Terminal and change directory to proect directory )
1. now let’s deploy our contract to local node by running :
cargo stylus deploy -e http://localhost:8547 --private-key 0xb6b15c8cb491557369f3c7d2c287b053eb229daa9c22138887752191c9520659
It will take few mins ( depends on local environments ) to compile into single wasm file, and then activating it to onchain.

It Will Look Like This
After the Deploy completes, you will get the Contract AddressDeployed Code At Address 0x... / Activating Program At Address 0x…
( take note of this address, we will need it for interaction )
Voila we / you successfully deployed a smart contract to test node.
Now we will need cast ( from Foundry ) to interact with our deployed smart contract
> next up we will do a cast call
by running :
cast call --rpc-url 'http://localhost:8547' --private-key 0xb6b15c8cb491557369f3c7d2c287b053eb229daa9c22138887752191c9520659 <contract address> "number()(uint256)"
the exit result would be 0
now let’s send a ‘increment’ transaction. it will increase the value to 1
let’s send a transaction first, then we will do a call.
we will send a increment transaction by following command :
cast call --rpc-url 'http://localhost:8547' --private-key 0xb6b15c8cb491557369f3c7d2c287b053eb229daa9c22138887752191c9520659 <contrac_address> "number()(uint256)"
The counter will display 1
here we incremented the value by 1
This way we can interact with our contract by using cast and Foundry Tools
Check Out More About Stylus : https://bento.me/stylus
Ethereum Resources : https://github.com/ethereum-lists
Note :
During Cargo Installation, you might face different isssue
for example I failed to install Cargo Stylus Package due to OpenSSL Package issue
after updating OpenSSL, this issue was solved.
So check each tools installation pages and docs carefully to experience smooth installation.
Using Online IDE might seems easy, but using local IDE and using command line tools will equip you with additional experience and problem solving skills.
Thanks. for. reading till here.
Have a great day.