Building a custom, use case-specific zkSync hyperchain from ground up is a complex and prolonged process. That’s because you need to work on everything– be it setting up zkEVM execution environment, programming smart contracts, or setting up crucial components such as nodes, prover, and sequencer. However, if you plan to launch your first zkSync Hyperchain, this article will help you. We will discuss both the programming and the point-and-click deployment, allowing you to choose a suitable option to launch zkSync Hyperchain.

What are zkSync Hyperchains?
Hyperchains are custom, use case-specific zkEVM chains running in parallel while sharing a common settlement layer. Although new, hyperchains are getting massive traction and are being built across a range of projects spanning DeFi, Gaming, payments, tokenization (NFTs & RWA), and more, where hyper scalability, security, and interoperability are top priorities.
Anyone can build their own hyperchain permissionlessly and deploy them to suit the specific needs of their application. Further, to make hyperchains interoperable, each hyperchains must use a single zkEVM engine that powers the first hyperchain; zkSync Era and is available with zkStack . This is just the basic definition of hyperchains. If you want to dive deeper into end-to-end details, including hyperchain’s architecture, important features, use cases, and more– check out the article linked below: What are zkSync Hyperchains & how do they bring hyper scalability to L3 dApps?
Key factors for Hyperchain’s rapid adoption:
Hyperchains are becoming one of the preferred choices for enterprises and web3 projects for various reasons, such as their simple proof aggregation technique, innovative concept of Layer3s, layered aggregation, in-built account abstraction, and faster proof generation. However, we will be spotlighting zkStack chain’s main features that really set it apart:
Hyper scalability: zkStack hyperchains are on-chain rollups that are designed to work as either Layer2 or Layer3 zkEVM chains. For both of these instances, transactions are computed off-chain with low network congestion and lower fees. This enables hyperchains to offer hyper scalability for all types of applications.
Sovereignty: All your hyperchains will function as sovereign chains, and this essentially means that proof of aggregation will be optional. Chains can choose to settle their proof on Layer1 Ethereum or on the zkSync Era ecosystem. In addition, hyperchains can join or exit the ecosystem anytime, removing or adding assets to the shared bridge.
Seamless inter-chain connectivity: Each of the hyperchains is powered by the same zkEVM engine, and they are interconnected through a shared hyperbridge. These enable zkStack chains to seamlessly interact and share arbitrary messages, assets, tokens, etc, as required.
Modularity: Hyperchains are modular by nature. It gives you the freedom to choose a specific sequencer, data availability (DA) layer, customize the privacy, choose between rollup or Validium, logical partitions, etc.
How to launch your first Zksync Hyperchain?
There are two main ways to build and launch your hyperchain from scratch– the traditional programming-based approach and the low-code way, which is enabled through Rollups-as-a-service (RaaS) platforms. We will discuss both options in this article:
Option:1 The programming way of building and launching Hyperchains
Launching a zkSync hyperchain from scratch requires you to perform several steps, from getting the prerequisites to setting up infrastructure, testing the hyperchain, and finally, deployment. To do this, you need extensive knowledge about zkSync Era, its frameworks & SDKs, plus you should have experience in rollup-specific development and multiple integrations.
1. Preparing the development environment:
Ensure you have basic dependencies for ZK tech, such as Node.js and npm installed in your system. Plus, you need to get all dependencies listed here. Once done. Clone the zkSync repository from GitHub through this link.
2. Configure your Hyperchain:
Create and compile configuration files of your hyperchain so that the chain suits your application requirements. The parameters here can be related to network & server settings, selection of virtual machine, smart contract, Zk components (like prover, sequencer, DA layer, aggregator), and RPC settings.
3. Test Hyperchain Locally:
For testing your hyperchain locally, you need to run the zkSync Server in a local environment and deploy contracts, wallets, and other components on the testnet to ensure they all function as expected.
4. Deploy your Hyperchain:
Deploy your hyperchain locally– follow the step-by-step instructions mentioned here. For in-production deployment, the process is almost similar to the local one. However, there will be a different configuration in Database and Server (consisting of sequencer and prover). Check these docs for more ZK tech information.
Option:2 The low-code hassle-free way to launch your own hyperchain
Zeeve’s one-click sandbox deployment tool enables a quick and hassle-free way to launch your custom zkSync hyperchain in DevNet. The sandbox tool is optimized to support rigorous testing of hyperchains on the Devnet, allowing projects to get 100% confidence before making the chain live on the mainnet. Below is a step-by-step process explaining how to deploy a hyperchain with Zeeve in minutes.
Step:1 Login to Zeeve if you already have an account, or else continue with signup. On the dashboard, navigate to appchain & rollups and click on ‘zkSync Hyperchains’.

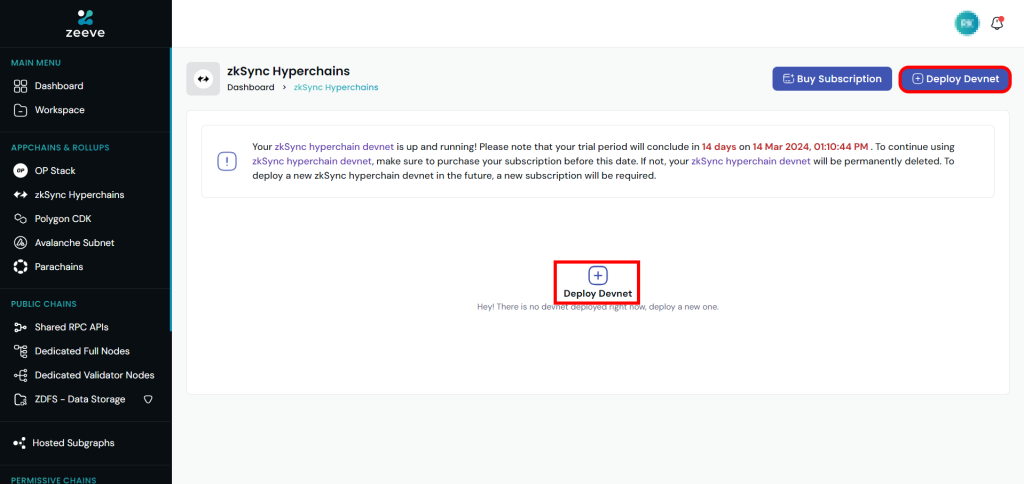
Step:2 A new dashboard similar to the below image will open. Click on ‘Deploy Devnet’ to start deploying Devnet for your hyperchain. Note that Zeeve’s zkSync sandbox is absolutely free to access for 15 days for a single user. Hence, you do not necessarily need a subscription to get started.

Step:3 A 3-step configuration panel will appear, showing general, RPC, and infrastructure configurations. For general configuration, provide details, such as a unique name for your hyperchain and hyperchain ID, and then select workspace, which you can set as default, or you can customize your own workspace. Fill in all the details and click ‘Next’.

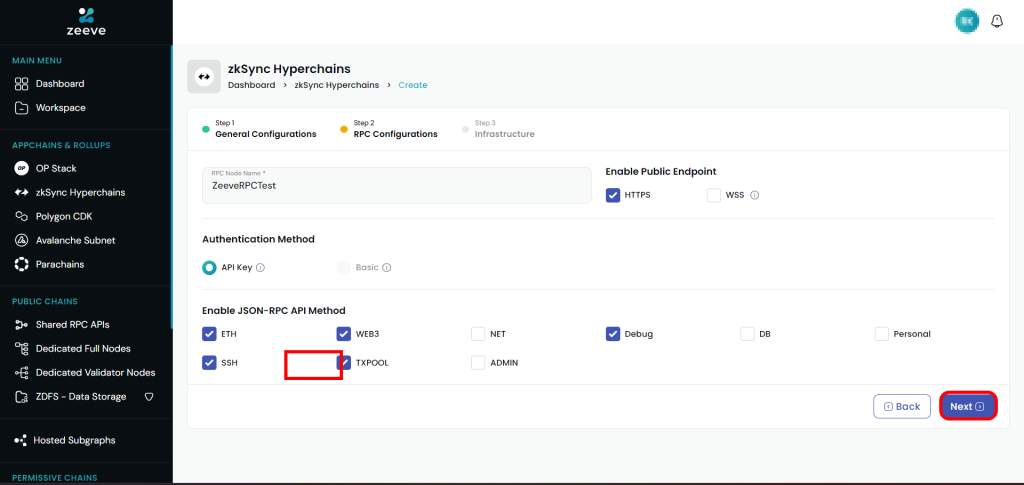
Step:4 Next is the RPC configuration of your hyperchain. For this, provide a RPC node name and enable public endpoint. On this same page, select the authentication method– API key or basic (connect with the Zeeve team for this). Further, enable your preferred JSON-RPC API Method. Click ‘Next’ once done.

Step:5 As the final step, complete the infrastructure-specific configuration of your chain. Select a region and click on submit to deploy your hyperchain.

That’s done! You have successfully deployed a Zksync hyperchain, which took only a few minutes.
Monitoring and Management of Hyperchains
Now that you have a running devNet for your zkSync hyperchain, you can monitor and manage it from the Zeeve’s dashboard. Again, navigate to zkSync Hyperchains and click on ‘View’.

A new page will open where you can see end-to-end details of your hyperchain network, such as overview, blockchain configuration, node performance, and cloud infrastructure. In case of any performance-related issue, you will get real-time alerts.


Pushing your zkSync Hyperchain to the Publicnet
After rigorous testing of your hyperchain on devnet, if you feel confident about moving the chain to mainnet, Zeeve will help you. Based on the exact configurations you’ve done on the devnet, Zeeve will set up your hyperchain network and make it live on the publicnet. Speaking about management, the process is similar to how we discussed the management of hyperchain on devnet. You can easily manage and scale your production-level hyperchains with Zeeve, ensuring their uptime and performance.
Deleting your Hyperchain:
If you wish to delete your hyperchain devnet and redeploy a new devnet, Zeeve’s sandbox tools allow you to do so. For this, go to the network details page and simply click on the delete icon on the right side. Confirm and delete your hyperchain.


Additional, 3rd Party Integrations for your zkSync Hyperchains:
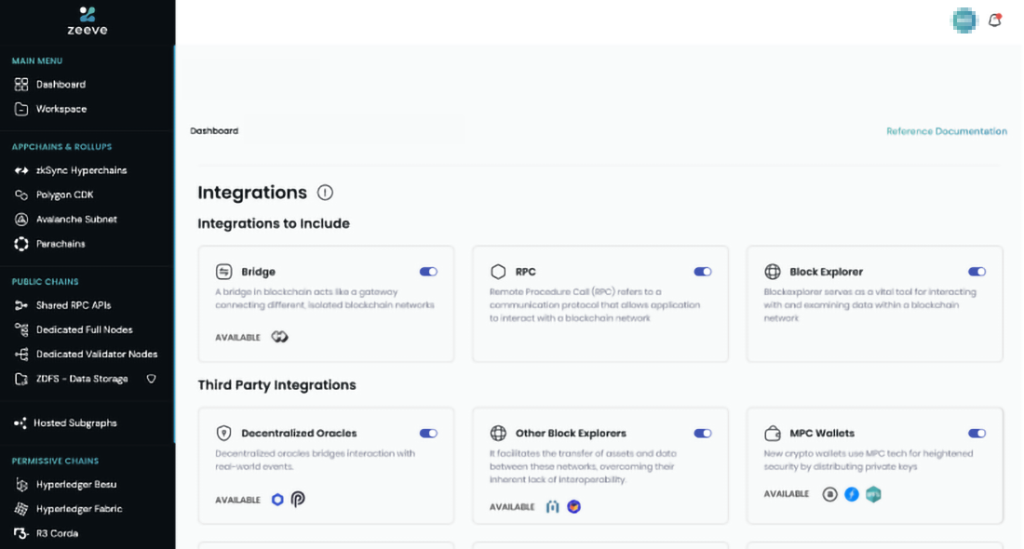
Knowing that modular rollup chains are the future and the top preference of a lot of web3 projects, Zeeve offers a variety of additional integrations from 3rd party rollup service providers. For example, you can choose Celestia, Avail/NearDA/ Eigen DA for an alternative DA layer. Similarly, you can choose decentralized oracles from Redstone or Pyth and block explorers from Blockscout or Dora.

Launch your production-grade L2/L3 Rollups easily with Zeeve
Zeeve Rollups-as-a-service (RaaS) stack is designed to support a range of Layer2 and Layer3 rollup launches. With sandbox tools for zkSync Hyperchain, Polygon CDK, and Arbitrum Orbit (coming soon), Zeeve is offering an easy route to hyperchain development, providing an abstraction layer over the resource-intensive and complex process of creating hyperchain. With that, Zeeve saves 97% of total development time and over 60% in total cost. Also, as we discussed, Zeeve RaaS offers a range of 3rd party integrations, from alt DA layer, to decentralized sequencer, account abstraction, and more, enhancing modularity of your rollup.
For more information on how Zeeve is simplifying the launch of Layer2 and layer3 rollups or diving deeper into our blockchain-related services, connect with our experts. You can send us your queries via mail or schedule a one-to-one call for a detailed discussion.
