


Creating a SAFE on Base
Base is growing, here is a post on creating a multi signatory Safe
henry
5 min read·
The Base network has received extraordinary attention recently, and it is well deserved. The network is fast, cheap and understandable. As more and more value is generated on the Base network, discussions about asset security are becoming more commonplace. One way to secure assets on blockchains is by using a multi-signatory smart contract (multisig). This smart contract utilizes multiple private keys to access and transfer assets stored within it. This makes multisigs great for DAOs, or just individuals who wish for a more secure way to store their digital assets.
I enjoy using SAFE, a product offered by Gnosis, for creating and managing multisigs. This blog post offers a step by step guide for creating and interacting with a multisig crated via SAFE on the Base L2 Network.
Setup
There are a few concepts we need to tackle first in order to get set up.
Make sure you have a wallet provider set up on your desktop wallet client with a Base RPC. The official base docs have a great set up guide which you can read here and an explainer on what an RPC is can be found here
Bridge some Layer 1 Ethereum to Base. You can do this on the official base bridge: https://bridge.base.org/
Switch to the Base RPC by selecting the new network within your wallet provider. Everything we do in this guide will be done on the base network
Guide
Okay now we can get started. Head to app.safe.global. On the main interface you will see the option to connect your wallet - go ahead and connect the wallet you wish to use to set up your SAFE.

After connecting, click Create Account. From here you will see the Create New Safe Account interface. On the left hand side, you can name your safe. "This name is stored locally and will never be shared with us or any third parties". (quote from app.safe.global)
On the right hand side, you see 'Your Safe Account preview'. The preview has a couple of important things. Make sure that the wallet is the wallet you would like to use to set up the safe, and the network is Base. If you don't see either of these, you may need to switch connected wallet, or select Base as your RPC URL in your wallet provider. If you have not done this yet, then see the Setup section of this post for information on how to set up your RPC URL.

Once you are happy with all the information here click the next button. The following page is information about your safe signers. The setup on this page is important and if misconfigured you may not be able to access assets in your multisig.

Before doing anything, check that the Wallet, Network and Name in the 'Your Safe Account preview' section are what you expect. They should match the content entered in the previous screen.
Now, on to the signers. A safe uses the concept of Transactions that multiple signers all sign in order to execute. As explained before, a multisig wallet works by requiring two or more private keys to execute a transaction. Whereas in a self-custody wallet you can just send an asset directly, in a multisig all signers must approve the transaction before the asset can be sent. I have included a diagram that demonstrates this below.

Hopefully this diagram conveys how multisig wallets improve overall security. It's important to note that any signer can reject a transaction. Doing so, will require a gas fee, as it cancels the transaction onchain. There is a great guide on this:
Cancel Transactions | Safe{Wallet} Help Center and Support.
In case you change your mind and want to not execute a transaction after all, there is a way to cancel pending transactions. However, the only way to effectively prevent already (partially) signed transaction to not be executed in the future, an "empty" transaction has to be executed at the same nonce.

Now, find the public addresses of the wallets you wish to use as a signer. A good practice here is to use one hot wallet (i.e. Rainbow, MetaMask, etc) and one cold wallet (i.e. Trezor, Ledger). Next, we can configure the threshold.
Now, let's set up the signer threshold. For this safe, we are setting it up to be 2 out of 3 signers. This means in order to perform any actions on assets in my safe, 2 signatures will be needed. One from a hot wallet, and another from a cold wallet (as the 3 signers added are a hot wallet and 2 ledgers).

Some fun information on this page - you can create an address book for wallets you regularly send to! And the address book is stored only on your local storage, and not shared with third parties.
Okay great, on the next screen we will review all of our setup information before proceeding to interact with the SAFE smart contract and create our multisig.

Once you have review all the information here and it looks accurate, hit Create. This will trigger a transaction and allow you to actually deploy your SAFE smart contract. Because this is Base, the gas fees are extremely reasonable. A great benefit of doing this on an L2!

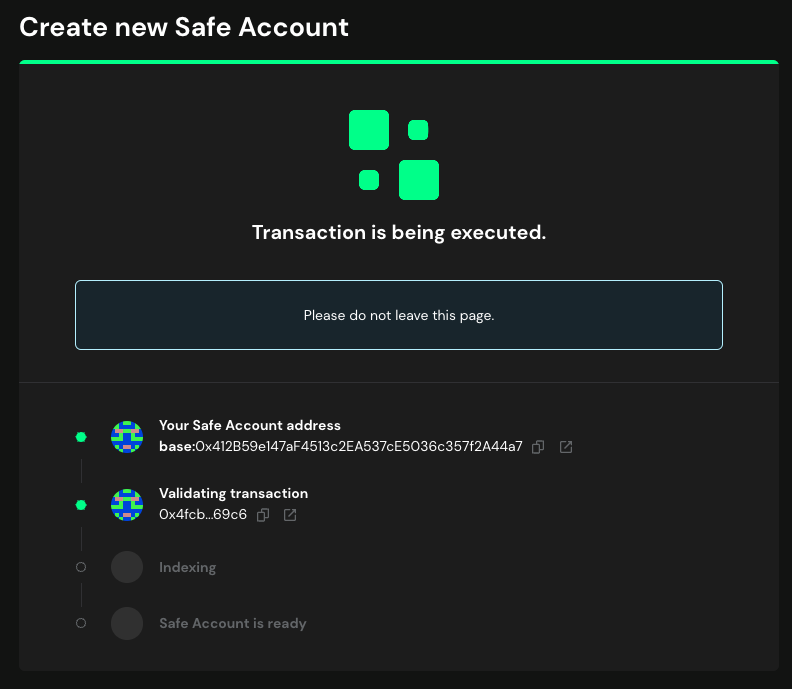


Congratulations! 🎉 you just created your first multisig safe! Now before we transfer any valuable assets into it, let's check everything works with the signers we sent to it. To do this, we are going to send a small amount of Base ETH into the SAFE, then send it out again. An important concept to note here:
Gas is never paid from your SAFE. Instead, it is paid by the final signer that you use. Good practice here may be to keep one of your signers topped up with gas fee ETH, and use that as your final signer every time
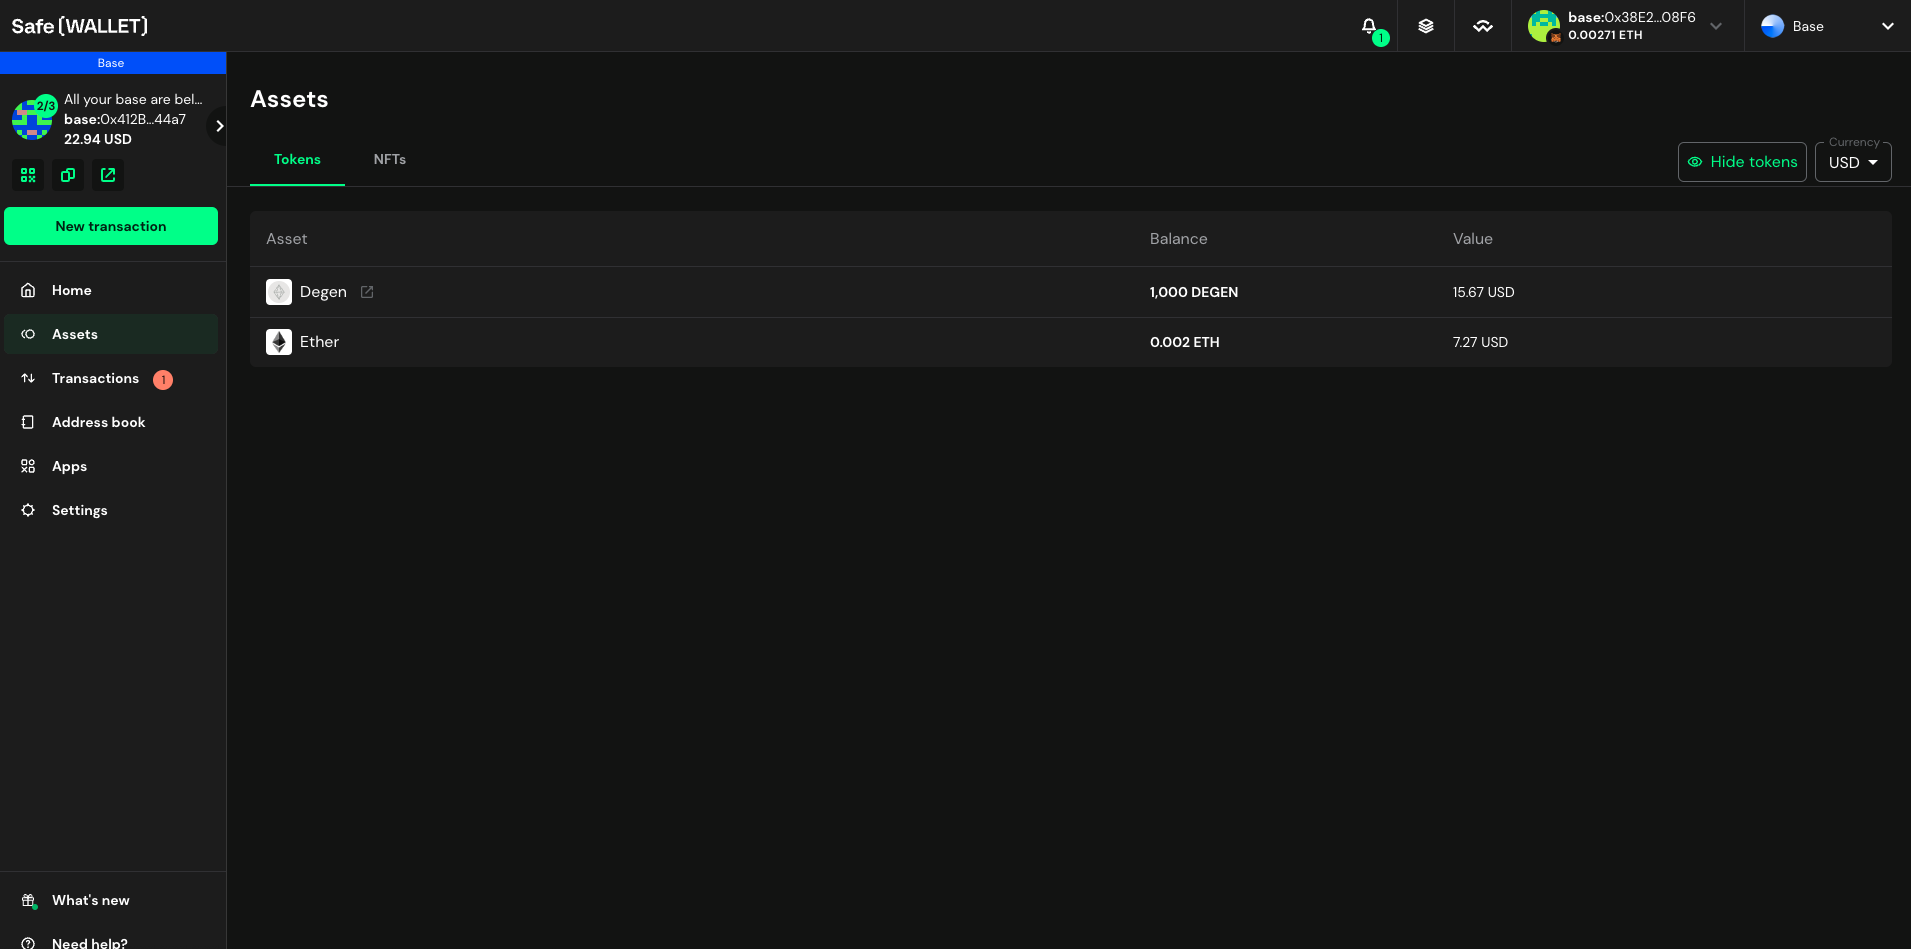
Alright alright alright let's get started. First we need to locate the public address of your safe. This is the address we will be sending the Base ETH to. We can get this from the top left of your SAFE.

Click this to copy the address to your clipboard. Now, head to a wallet you have access to send transactions on, and we are going to send a small amount of ETH from it, to the address we just copied. Note: the address will be prefixed with 'base' so you may need to remove this before sending. Here's the error that MetaMask will give you if this is the case:

You can change this in your safe settings.

Okay great, now that you have some assets in your SAFE, we can send them out again. To do this, select New Transaction. Once you have done this, you will be presented with the following screen. As you can see, the SAFE UI has a transaction builder. This is great when sending multiple assets. The SAFE documentation is detailed and great at explaining these concepts.
Transaction Builder | Safe{Wallet} Help Center and Support.
Create a batched transaction with the Transaction Builder Safe App.
Select Send Tokens, and input an address you have access to (or your frens address if you're feeling generous!)


Once you have happy with all the information here, hit Next. You will be presented with the Confirm transaction screen. Some important things to check:
to(address): clicking the external link icon will take you to Basescan so you can verify the address you are sending assets to
value(uint256): the WEI value of your transaction (if sending ether). You can convert this to ETH using a converter.
Ethereum Unit Converter
After constantly using a calculator to convert between Ether units i thought it would neat to implement the EthereumJS-Units library and BigNumber library on a website for everyone to use. There is a simple and full converter page, since the majority wouldn't bother for any other units than Ether, Gwei and Wei.

Once you are happy with this, you can sign to create the transaction. Note that the Transaction status has 'Confirmed (0 of 2)' meaning that your 2 signers are being recognised, and are required to execute this action onchain. Let's sign this transaction.
Great! Now we can see that our Transactions tab has 1 pending transaction.
Now, let's head over to our Transactions tab and see what's waiting for us there.

We can see in the screenshot above that there is one pending transaction for a send. It has one confirmation, and needs to be signed by one other signer. So let's connect the second wallet we added as a signer, and execute this transaction. We can do this by selecting the wallet from our wallet provider and connecting it to the SAFE website. If you connect with the correct wallet, you will see a popup telling you there is one transaction that needs to be confirmed.

We can see that the interface has changed and there is now a 'Confirm' button.

Clicking confirm will take us again to the confirm transaction screen, only this time it will look slightly different. This is because we are executing the transaction. Before, we signed the transaction and created it. This time, we are applying it to the blockchain. This is why we need to pay gas. This is the final step before the assets leave your multisig. Check everything here!

Just as with signing, we can double check the transaction details by selecting the accordion.

Once you are happy with all the information in this screen, click Execute. This will trigger an onchain transaction requiring gas. You will see a similar transaction screen to before, just like when we were setting up the safe!
If you wish, you can view the Transaction after completion.

And that's it! Congratulations, you just set up a multisig using SAFE on the Base Layer 2 chain!
The same concept we just tackled for sending ETH is mirrored for sending NFTs and ERC-20s. There are fantastic guides on the official SAFE docs which go in depth on how to do this
Send funds | Safe{Wallet} Help Center and Support.
How to send ETH and ERC-20 tokens from your Safe.
How to manage CryptoPunks with Safe | Safe{Wallet} Help Center and Support.
How to store and transfer your punk.
Supported asset types | Safe{Wallet} Help Center and Support.
This article provides an overview of the different types of assets that can be managed with your Safe.
Thank you for reading. If any concepts are unclear, or you have any feedback please reach out! Would love to write more educational articles on different concepts within web3.
Have a nice day!

gm /degen I wrote a blog article on @paragraph which details setting up a multisig SAFE on Base and sending/receiving assets from it Keep your $DEGEN SAFE! 🎩 https://paragraph.xyz/@henrypye/multisig-on-base
🔥🔥🔥 1111 $degen
10 $degen
30 $DEGEN