How to Mint a Tezos NFT on Objkt.com
Twitter Instagram Pinterest Youtube Facebook Tiktok Cart-plus
A Step-by-step objkt.com Tutorial
Minting a Tezos NFT on Objkt.com is straighfoward once you get used to the website's interface. In this guide, I will walk you through the steps that you need to take to mint your first piece of digital art as a Tezos NFT.
My name is Lauren McDonagh-Pereira.
[caption id="attachment_78" align="aligncenter" width="300"]

Lauren McDonagh-Pereira[/caption]
I am a photographer, NFT artist, NFT collector, and web3 blogger. I have been fully immersed in the NFT art space since February 2022. And I have been part of the Tezos community since May 2022.
I want to help newcomers to the NFT Community learn how to get started with minting and collecting art as non-fungible tokens. Keep reading to learn how to create your first Tezos NFT on Objkt.com.

Disclaimer
[caption id="attachment_746" align="aligncenter" width="300"]
ⓒ Lauren McDonagh-Pereira Photography 2013[/caption]
Before we get into it, please consider a few quick DISCLAIMERS.
I am not a financial advisor, an art expert, a lawyer, or an accountant. Always do your own research before purchasing NFTs and never spend money that you cannot afford to spend.
This post represents my personal opinions and is NOT financial advice.
I am an NFT artist. At the time of posting, I have works minted on the Tezos and Ethereum blockchains. Links contained in this article may point to my own minted NFTs or may point to the NFTs of other artists that I have collected from. If you choose to collect NFTs referenced in this article, I may earn money from your purchase.
What is a Tezos NFT?
A Tezos NFT is a digital file that has been turned into a non-fungible token on the Tezos cryptocurrency blockchain.
Tezos is a great choice for artists because the fees for creating NFTs and collections of NFTs are very low compared to other blockchains. To get started on Objkt.com, you only need to spend around five dollars.
The Tezos ecosystem has distinguished itself within the blockchain arena, particularly for its energy-efficient proof of stake mechanism. This not only makes Tezos a more environmentally friendly option compared to the Ethereum blockchain, but it also contributes to its low transaction fees. For artists and collectors, this means that the cost of minting NFTs (non-fungible tokens) and making transactions is significantly reduced, making it an attractive platform for those new to the NFT space. Furthermore, Tezos NFT marketplaces like Objkt.com offer a user-friendly approach, enabling artists and collectors to easily mint, buy, and sell NFTs. The platform supports a variety of digital file types, including audio files and unique works of generative art, making it a versatile choice for artists from diverse backgrounds.
In recent years, Tezos has gained notable attention in major events like Art Basel Miami Beach, highlighting its growing prominence in the art world. This has led to an increase in Tezos users and a burgeoning Tezos NFT community, both of which have contributed to the platform's reputation as one of the largest NFT marketplaces. The Tezos blockchain’s capability to handle smart contracts efficiently allows for unique features like royalty splits and custom collections, giving artists more control over their work. With its proven track record and an expanding community of global artists, Tezos is fast becoming a major player in the NFT markets, offering a platform for artists to showcase their unique digital assets to a digitally connected world.

PREREQUISTIES FOR CREATING A TEZOS NFT ON OBJKT.COM
To follow this tutorial you need:
At least 5 Tezos – In the US, you can buy these through Coinbase.
A Tezos wallet. I use the Temple wallet.
An account on Objkt.com.
An NFT Collection on Objkt.com. Read my tutorial to learn how to create a Tezos NFT collection.
To embark on your journey of creating a Tezos NFT on the Objkt platform, it's essential to understand and meet the prerequisites. This guide will provide you with a detailed overview of each step, incorporating the unique aspects of the Tezos ecosystem and the Objkt marketplace.
Firstly, possessing at least 5 Tezos (XTZ) is fundamental. As of the time of writing, in the United States, one of the most straightforward ways to purchase Tezos is through Coinbase, one of the major exchanges. The affordability of Tezos, coupled with low transaction costs, makes it a viable option for those venturing into the NFT space for the first time.
Next, you will need a Tezos wallet. The Tezos ecosystem supports several wallets, but for this tutorial, I recommend the Temple wallet. It is user-friendly and integrates seamlessly with Objkt.com. Another popular option is the Kukai wallet, known for its security and ease of use. Your Tezos wallet address acts as your unique identifier in the Tezos NFT community and is essential for all your transactions.
Creating an account on Objkt.com is your next step. Objkt.com is not just one of the largest NFT marketplaces in the Tezos ecosystem but also a thriving hub for artists and collectors. As a platform, it offers a simple dropdown menu interface, making navigation straightforward even for first-time users. The Objkt platform allows you to interact with a diverse community of global artists, nft collectors, and enthusiasts, all passionate about the growing world of Tezos NFTs.
An essential aspect of your NFT journey on Objkt.com is establishing your own NFT collection. This collection represents your unique digital assets and is a showcase of your creativity. As a new or seasoned NFT artist, creating your first collection on Objkt.com is a milestone. It's a space where you can express your artistic vision, be it through traditional artwork, generative art, or multidisciplinary projects. For guidance on creating a Tezos NFT collection, you can refer to my detailed tutorial.
Remember, the Tezos ecosystem is known for its low gas fees, which is a significant advantage for those looking to mint Nfts. This makes the creation and exchange of NFT tokens more accessible and affordable. At Objkt.com, you'll find a range of NFT tokens, from profile pictures to unique works of art, all available for you to explore and be inspired by.
Lastly, do not hesitate to reach out for help. The Tez Tunas community on Discord and our Twitter community are vibrant sources of knowledge and support. Whether it’s your first time minting an NFT or you’re an experienced artist, these communities are here to assist you through every step of your journey.
By meeting these prerequisites, you're well on your way to becoming an active participant in the exciting and innovative world of Tezos NFTs. Remember, the world of NFTs is ever-evolving, and staying updated with the latest trends and innovations is key to succeeding in this digitally connected arena.
If you need help with any of these prerequisite steps, reach out to members of the Tez Tunas community on Discord or in our Twitter community.
How To Create A TEzos NFT on Objkt.com
Navigate to the Objkt.com home page and sign in with your Tezos wallet.[caption id="attachment_1464" align="aligncenter" width="300"]

The Objkt.com Homepage[/caption]
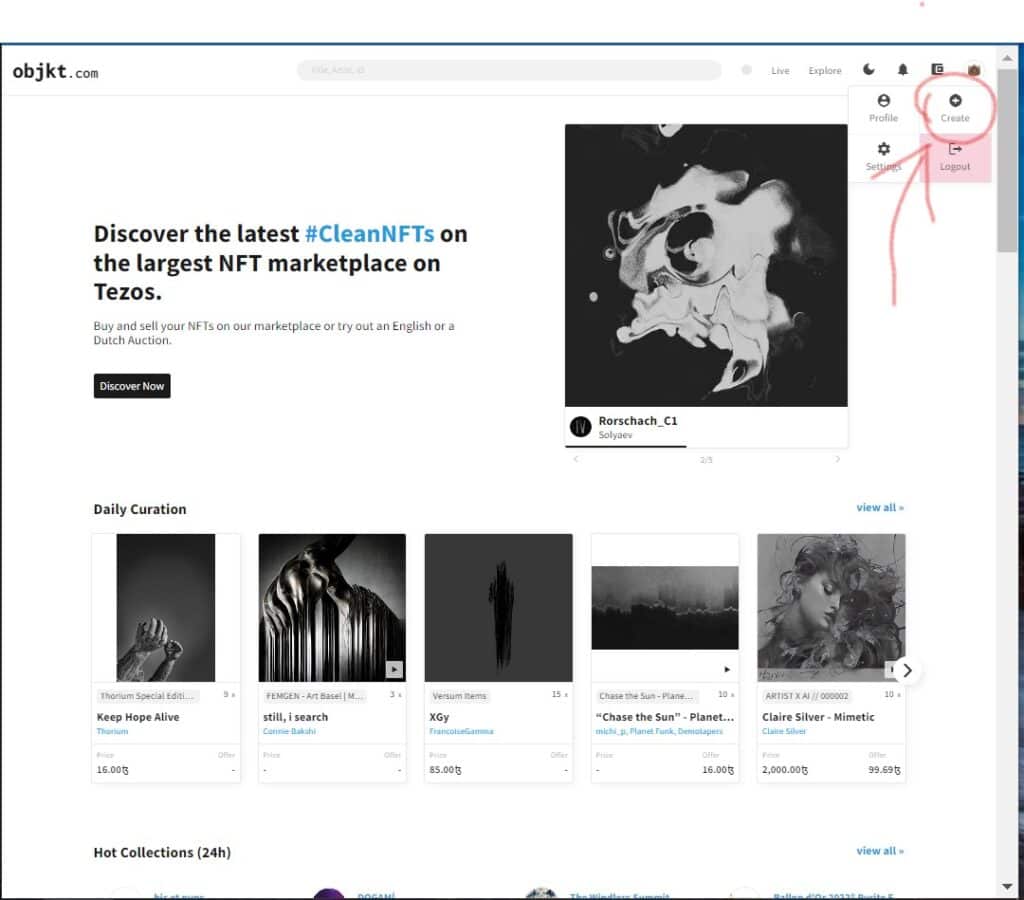
Click on the little hamburger symbol in the top right corner of the page.[caption id="attachment_1465" align="aligncenter" width="300"]

Objkt.com Navigation Menu [/caption]
Choose the option that says “Create”.[caption id="attachment_1466" align="aligncenter" width="1024"]
Create[/caption]
Make sure that you are creating a new token. NFT stands for “Non-fungible token”, so in this case a token is the individual piece of art that you want to mint.[caption id="attachment_1584" align="aligncenter" width="1024"]

Create a New Token[/caption]
Click in the box under “Upload File” and add a media file that you want to turn into an NFT from your computer.[caption id="attachment_1585" align="aligncenter" width="1024"]

Upload a Media File[/caption]
Name your piece with a unique title that fits your work of art.[caption id="attachment_1586" align="aligncenter" width="1024"]

Title Your NFT[/caption]
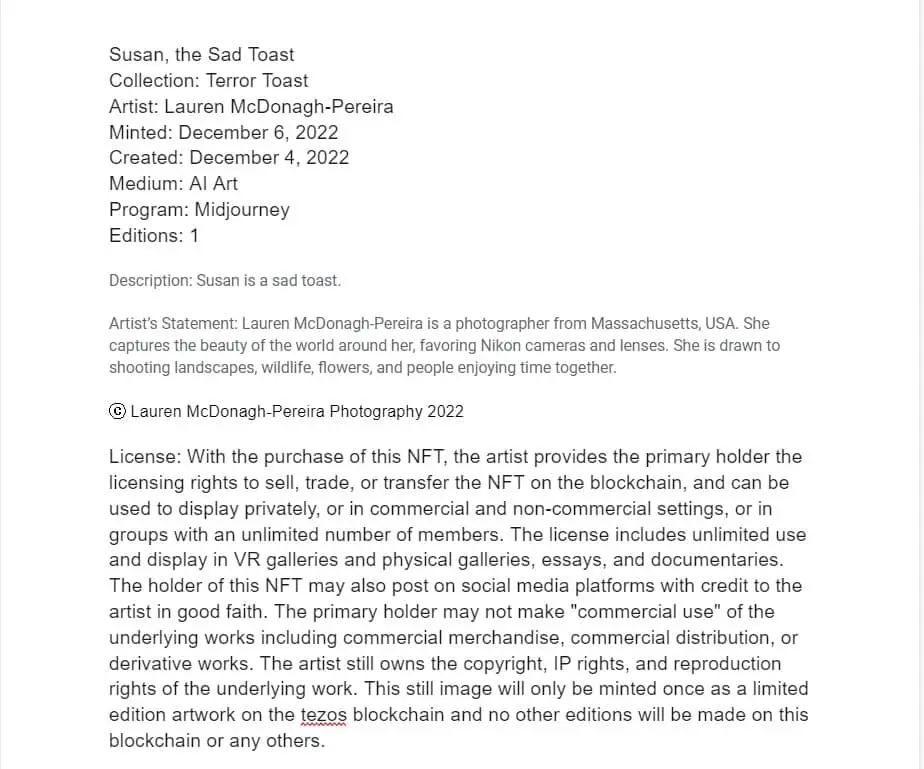
Write your description in the “Description” box. I like to write my description in GoogleDocs and then copy and paste it into the text box on Objkt.com.
I always include the name of the piece, the name of the collection, my name, the date the NFT was minted, the date the piece was created, specific details about how the piece was created, and how many editions I originally minted.
I then write a brief description explaining my thoughts on the piece, how it fits into the larger collection, and explain something about the creation process.
Below the description, I add my brief artist’s statement, my copyright, and the license explaining the rights that I am granting to the person who collects my NFT.
[caption id="attachment_1587" align="aligncenter" width="924"]
Describe Your Tezos NFT[/caption]
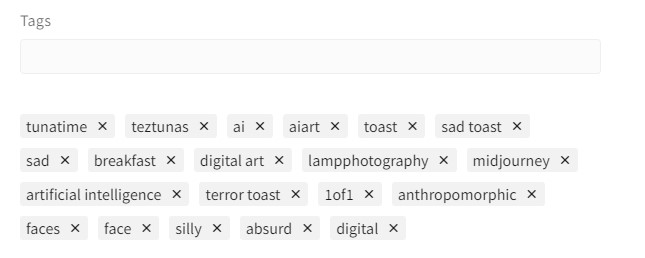
Enter your tags. It is extremely important that you use the correct tags in the “Tags” box on Objkt if you are minting a piece for a specific Tezos community event.
For the #TunaTime event, participants were asked to add “#TunaTime” to the tags on Objkt.com. To do so, they simply needed to type “TunaTime” with or without a hashtag into the “Tags” box on Objkt.com and hit enter.
The tag should now show up below the “Tags” box with a little X next to it.
[caption id="attachment_1588" align="aligncenter" width="1024"]

Tag Your NFT[/caption]
Continue entering any relevant tags that you can think of that fit your piece. Collectors can go to Objkt.com and search for pieces based on the tags used when they are minted. I like to imagine what someone who would collect my piece might be looking for when they are browsing Objkt, and enter all those search terms as tags.
You must enter all of your relevant tags before you mint your piece. Once your piece is minted, you will not be able to go back and edit any of the information. You will have to burn your piece, and start over if you want to make any changes. After someone collects an edition of your piece, it will be impossible to make any changes.
[caption id="attachment_1589" align="aligncenter" width="645"]
Add All Relevant Tags[/caption]
Choose the collection you want the piece to be minted into. Make sure you choose the correct collection from the drop down menu. You will not be able to change this after your piece is minted.[caption id="attachment_1590" align="aligncenter" width="730"]

Choose a Collection for Your NFT[/caption]
Choose the type of license that you want to grant to the collector of your NFT. You can retain full copyright by choosing “No License” or you can grant your collector more rights with a CCO, CC-By, or CC By-SA license.[caption id="attachment_1591" align="aligncenter" width="673"]

Choose Your License[/caption]
Choose how many editions you want to mint. Editions are the numbers of copies of a particular NFT that will be available for people to collect. If you mint 1 edition, only one person will ever be able to hold a copy of that image as a Tezos NFT. If you mint 10,000 editions, 10,000 identical copies of your NFT will be available for people to collect.[caption id="attachment_1592" align="aligncenter" width="700"]

Choose How Many Editions to Mint[/caption]
Set your royalty percentage. Your royalty can be between 0% and 25%. This will be the percentage of any future sales that get funneled back to your Tezos wallet if your piece sells on the secondary market in the future.
For example, you can set your royalty at 10%. A collector might purchase your piece for 5 TEZ. In the future, the collector might choose to flip, or resell, your piece for a higher price. Let’s assume that your collector is able to sell your piece to someone else for 100 tezos. Because you set your royalty at 10%, your wallet will receive 10 TEZ (or 10% of that secondary sale) and the collector who resold your piece would receive the other 90 TEZ. Your wallet would continue to receive 10% of every sale every time your NFT is sold on the Tezos blockchain.
[caption id="attachment_1593" align="aligncenter" width="655"]
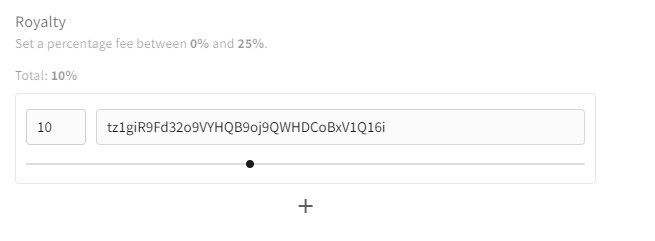
Set Your Royalty Fee[/caption]
Set your server. Decide whether you want to mint your piece with the Tezos server based in the Americas, Asia, or Europe using the drop down menu.[caption id="attachment_1594" align="aligncenter" width="718"]
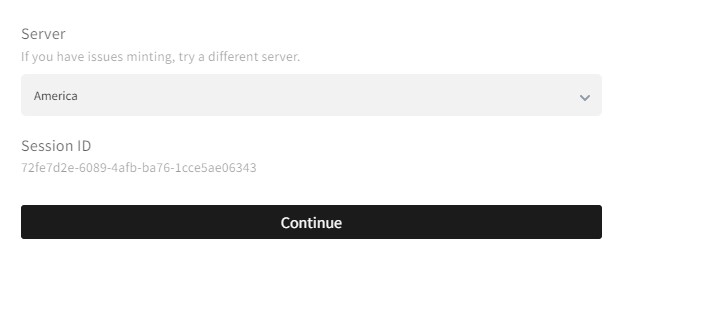
Select Your Server[/caption]
Review the information you have entered and select “Continue” at the bottom of the page when you are satisfied. Remember! There is no way to edit any of these fields after this step. If you need to make changes, you will have to pay a gas fee to burn (delete) the piece and start over.[caption id="attachment_1595" align="aligncenter" width="1024"]

Confirm Your NFT Minting[/caption]
Log into your Tezos wallet by entering your password when your wallet plug in pops up.[caption id="attachment_1472" align="aligncenter" width="1024"]

Open your Tezos Wallet[/caption]
Review the minimal gas fee and confirm you desire to mint the piece. This is usually around 0.1 TEZ.[caption id="attachment_1596" align="aligncenter" width="1024"]

Confirm Your Mint[/caption]
Congratulations! You have successfully minted a Tezos NFT!
Conclusion
If you have followed these steps, you should now be ready to list your Tezos NFT for sale.
To learn why people collect NFTs, read my article here.
To learn why artists are excited about NFTs, read this article.
To learn how to grow your presence on NFT Twitter, check out this piece.
Leave a comment and let me know what NFT topics you would like me to cover next.
More to explore
KEEP READING

MEET Lauren McDonagh-Pereira
Lauren McDonagh-Pereira is a photographer from Massachusetts, USA. She captures the beauty of the world around her, favoring Nikon cameras and lenses. She is drawn to shooting landscapes, wildlife, nature, and people authentically enjoying life.
Twitter Twitter Instagram Linkedin Pinterest Facebook Tiktok Youtube Ethereum


https://paragraph.xyz/@lampphotography/how-to-mint-a-tezos-nft-on-objktcom
🥰🥰🥰
Check out Moxie earn 5x 🌹